Domains
Railway provides two types of domain resolution for your services: public domains for internet access and private domains for internal service-to-service communication.
Public domains
Public domains expose your services to the internet. Railway offers two options:
- Railway-provided domains - Auto-generated
*.up.railway.appdomains for quick setup - Custom domains - Bring your own domain with automatic SSL certificate provisioning
Railway-provided domains
Railway services don't obtain a domain automatically, but it is easy to set one up.
To assign a domain to your service, go to your service's settings, find the Networking -> Public Networking section, and choose Generate Domain.
Automated prompt
If Railway detects that a deployed service is listening correctly, you will see a prompt on the service tile in the canvas, and within the service panel.
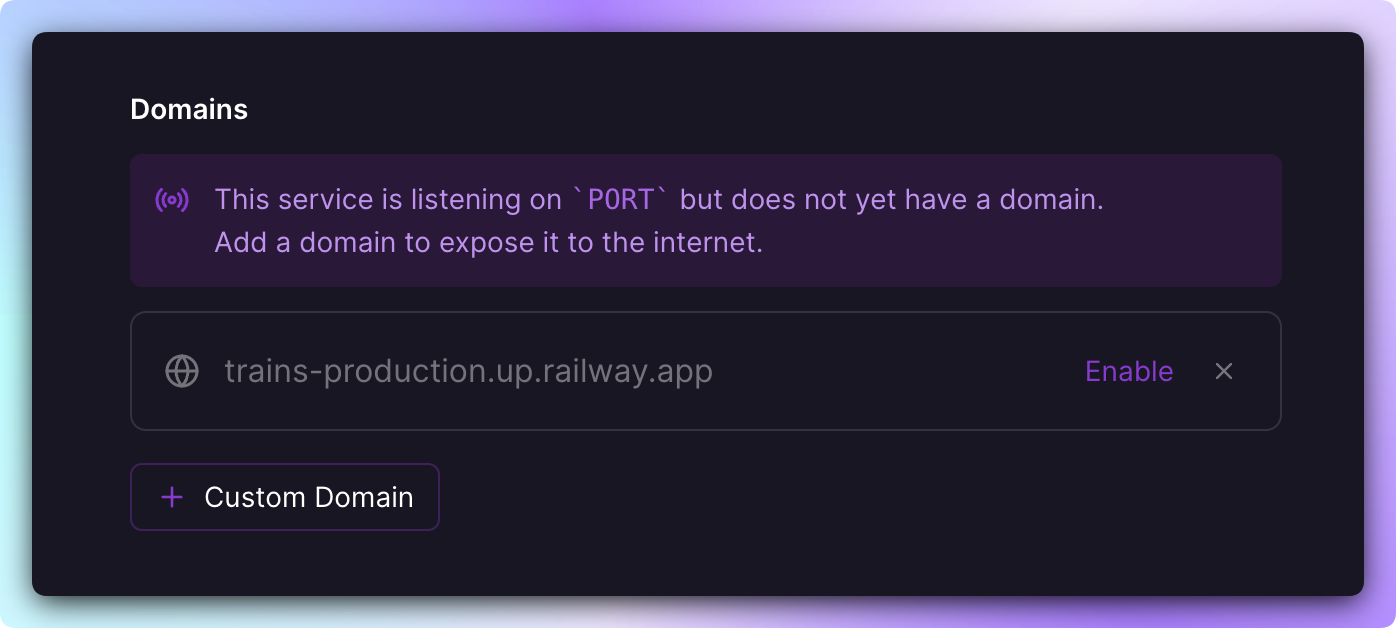
Simply follow the prompts to generate a domain and your app will be exposed to the internet.
Don't see the Generate Domain Button?
If you have previously assigned a TCP Proxy to your service, you will not see the Generate Domain option. You must remove the TCP Proxy (click the Trashcan icon), then you can add a domain.
Custom domains
Custom domains can be added to a Railway service and once setup we will automatically issue an SSL certificate for you.
-
Navigate to the Settings tab of your desired service.
-
Click
+ Custom Domainin the Public Networking section of Settings -
Type in the custom domain (wildcard domains are supported, see below for more details)
You will be provided with a CNAME domain to use, e.g.,
g05ns7.up.railway.app. -
In your DNS provider (Cloudflare, DNSimple, Namecheap, etc), create a CNAME record with the CNAME value provided by Railway.
-
Wait for Railway to verify your domain. When verified, you will see a green check mark next to the domain(s) -
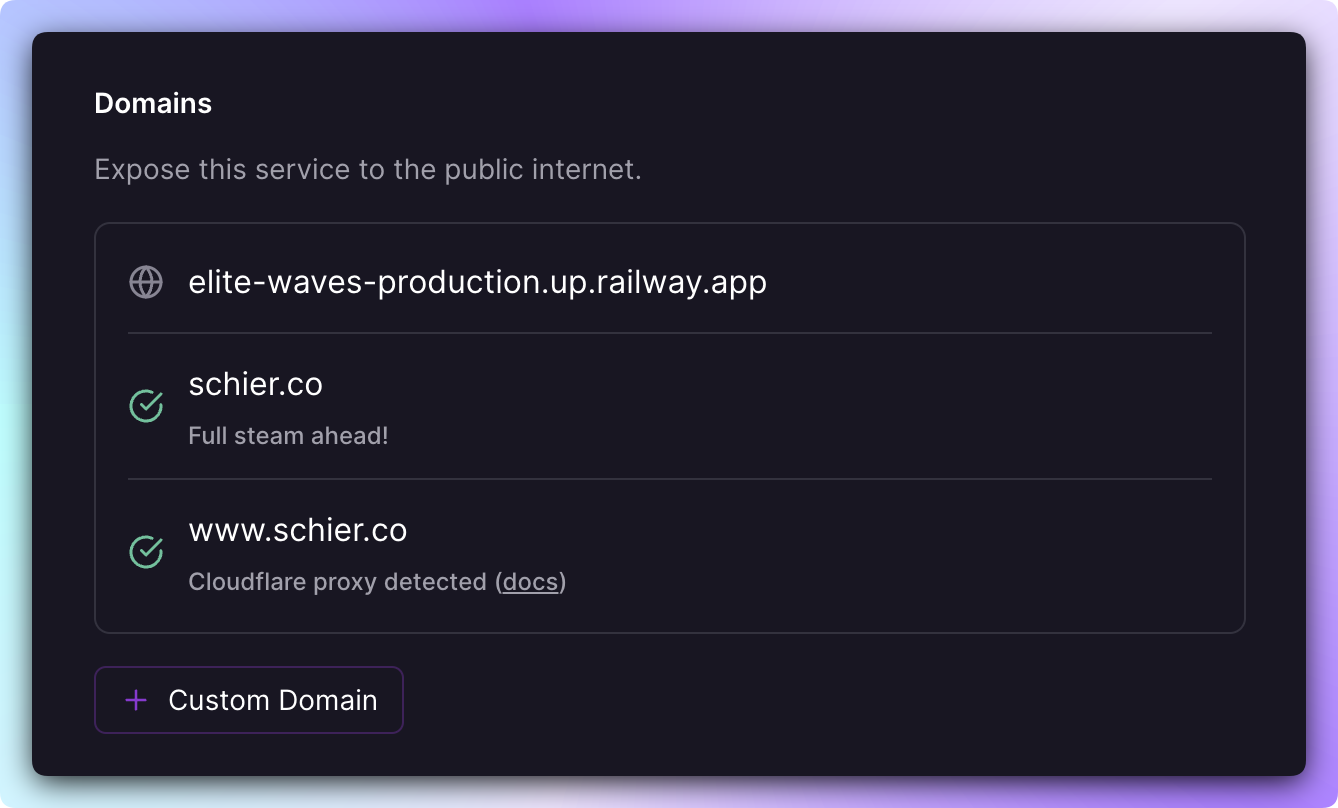
You will also see a
Cloudflare proxy detectedmessage if we have detected that you are using Cloudflare.Note: Changes to DNS settings may take up to 72 hours to propagate worldwide.
Important considerations
- Freenom domains are not allowed and not supported.
- The Trial Plan is limited to 1 custom domain. It is therefore not possible to use both
yourdomain.comandwww.yourdomain.comas these are considered two distinct custom domains. - The Hobby Plan is limited to 2 custom domains per service.
- The Pro Plan is limited to 20 domains per service by default. This limit can be increased for Pro users on request, simply reach out to us via a private thread.
Wildcard domains
Wildcard domains allow for flexible subdomain management. There are a few important things to know when using them -
-
Ensure that the CNAME record for
authorize.railwaydns.netis not proxied by your provider (eg: Cloudflare). This is required for the verification process to work. -
Wildcards cannot be nested (e.g., *.*.yourdomain.com).
-
Wildcards can be used for any subdomain level (e.g.,
*.example.comor*.subdomain.example.com).
Subdomains
E.g. *.example.com
-
Make sure Universal SSL is enabled.
-
Enable Full SSL/TLS encryption.
-
Add CNAME records for the wildcard subdomain.
Nested subdomains
E.g. *.nested.example.com
-
Purchase Cloudflare's Advanced Certificate Manager.
-
Enable Edge Certificates.
-
Enable Full SSL/TLS encryption.
-
Add CNAME records for the wildcard nested subdomain.
When you add a wildcard domain, you will be provided with two domains for which you should add two CNAME records -

One record is for the wildcard domain, and one for the _acme-challenge. The _acme-challenge CNAME is required for Railway to issue the SSL Certificate for your domain.
Wildcard domains on Cloudflare
If you have a wildcard domain on Cloudflare, you must:
-
Turn off Cloudflare proxying on the
_acme-challengerecord (disable the orange cloud) -
Enable Cloudflare's Universal SSL
Target ports
Target Ports, or Magic Ports, correlate a single domain to a specific internal port that the application listens on, enabling you to expose multiple HTTP ports through the use of multiple domains.
Example -
https://example.com/ → :8080
https://management.example.com/ → :9000
When you first generate a Railway-provided domain, if your application listens on a single port, Railway's magic automatically detects and sets it as the domain's target port. If your app listens on multiple ports, you're provided with a list to choose from.
When you add a custom domain, you're given a list of ports to choose from, and the selected port will handle all traffic routed to the domain. You can also specify a custom port if needed.
These target ports inform Railway which public domain corresponds to each internal port, ensuring that traffic from a specific domain is correctly routed to your application.
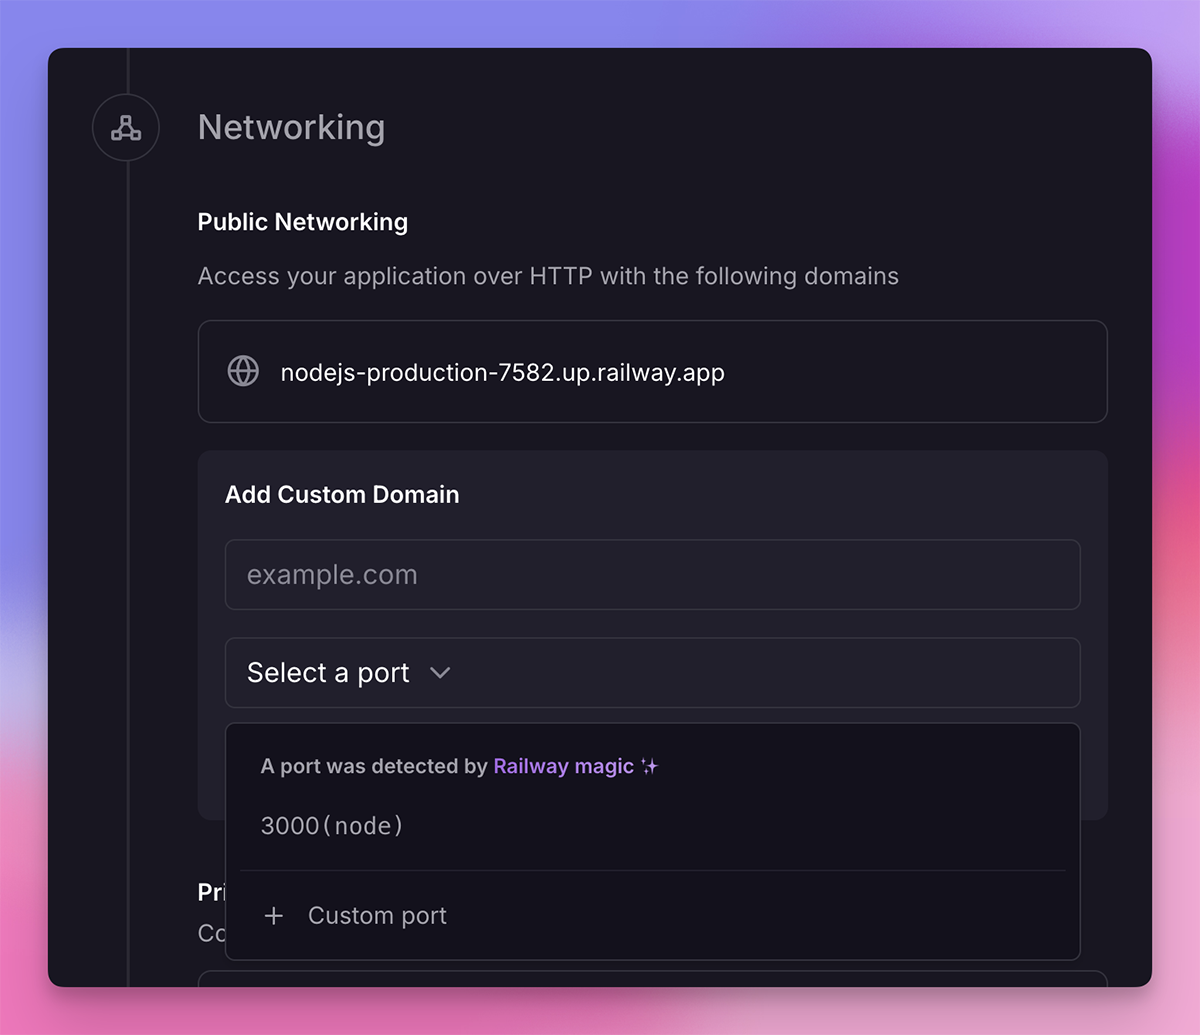
You can change the automatically detected or manually set port at any time by clicking the edit icon next to the domain.
Adding a root domain
When adding a root or apex domain to your Railway service, you must ensure that you add the appropriate DNS record to the domain within your DNS provider. At this time, Railway supports CNAME Flattening and dynamic ALIAS records.
Additional context
Generally, direct CNAME records at the root or apex level are incompatible with DNS standards (which assert that you should use an "A" or "AAAA" record). However, given the dynamic nature of the modern web and PaaS providers like Railway, some DNS providers have incorporated workarounds enabling CNAME-like records to be associated with root domains. Check out RFC 1912 if you're interested in digging into this topic.
Choosing the correct record type
The type of record to create is entirely dependent on your DNS provider. Here are some examples -
- Cloudflare CNAME - Simply set up a CNAME record for your root domain in Cloudflare, and they take care of the rest under the hood. Refer to this guide for more detailed instructions.
- DNSimple ALIAS - Set up a dynamic ALIAS in DNSimple for your root domain.
- Namecheap CNAME - Set up a CNAME in Namecheap for your root domain.
- bunny.net - Set up a ANAME in bunny.net for your root domain.
In contrast there are many nameservers that don't support CNAME flattening or dynamic ALIAS records -
Workaround - Changing your Domain's Nameservers
If your DNS provider doesn't support CNAME Flattening or dynamic ALIAS records at the root, you can also change your domain's nameservers to point to Cloudflare's nameservers. This will allow you to use a CNAME record for the root domain. Follow the instructions listed on Cloudflare's documentation to change your nameservers.
Adding a root domain with www subdomain to Cloudflare
If you want to add your root domain (e.g., mydomain.com) and the www. subdomain to Cloudflare and redirect all www. traffic to the root domain:
- Create a Custom Domain in Railway for your root domain (e.g.,
mydomain.com). Copy thevaluefield. This will be in the form:abc123.up.railway.app. - Add a
CNAMEDNS record to Cloudflare:Name→@.Target→ thevaluefield from Railway.Proxy status→on, should display an orange cloud.- Note: Due to domain flattening,
Namewill automatically update to your root domain (e.g.,mydomain.com).
- Add another
CNAMEDNS record to Cloudflare:Name→www.Target→@Proxy status:→ on, should display an orange cloud.- Note: Cloudflare will automatically change the
Targetvalue to your root domain.
- Enable Full SSL/TLS encryption in Cloudflare:
- Go to your domain on Cloudflare.
- Navigate to
SSL/TLS -> Overview. - Select
Full. NotFull (Strict)Strict mode will not work as intended.
- Enable Universal SSL in Cloudflare:
- Go to your domain on Cloudflare.
- Navigate to
SSL/TLS -> Edge Certificates. - Enable
Universal SSL.
- After doing this, you should see
Cloudflare proxy detectedon your Custom Domain in Railway with a green cloud. - Create a Bulk Redirect in Cloudflare:
- Go to your Cloudflare dashboard.
- Navigate to
Bulk Redirects. - Click
Create Bulk Redirect List. - Give it a name, e.g.,
www-redirect. - Click
Or, manually add URL redirects. - Add a
Source URL:https://www.mydomain.com. - Add
Target URL:https://mydomain.comwith status301. - Tick all the parameter options: (
Preserve query string,Include subdomains,Subpath matching,Preserve path suffix) - Click
Next, thenSave and Deploy.
Note: DNS changes may take some time to propagate. You may want to refresh your DNS cache by using commands like ipconfig /flushdns on Windows or dscacheutil -flushcache on macOS. Testing the URLs in an incognito window can also help verify changes.
SSL certificates
Once a custom domain has been correctly configured, Railway will automatically generate and apply a Let's Encrypt certificate. This means that any custom domain on Railway will automatically be accessible via https://.
We provide LetsEncrypt SSL certificates using RSA 2048bit keys. Certificates are valid for 90 days and are automatically renewed when 30 days of validity remain.
Certificate issuance should happen within an hour of your DNS being updated with the values we provide.
For proxied domains (Cloudflare orange cloud), we may not always be able to issue a certificate for the domain, but Cloudflare to Railway traffic will be encrypted with TLS using the default Railway *.up.railway.app certificate.
External SSL certificates
We currently do not support external SSL certificates since we provision one for you.
Cloudflare configuration
If you have proxying enabled on Cloudflare (the orange cloud), you MUST set your SSL/TLS settings to Full -- Full (Strict) will not work as intended.

If proxying is not enabled, Cloudflare will not associate the domain with your Railway project. In this case, you will encounter the following error message:
Also note that if proxying is enabled, you can NOT use a domain deeper than a first level subdomain without Cloudflare's Advanced Certificate Manager. For example, anything falling under *.yourdomain.com can be proxied through Cloudflare without issue, however if you have a custom domain under *.subdomain.yourdomain.com, you MUST disable Cloudflare Proxying and set the CNAME record to DNS Only (the grey cloud), unless you have Cloudflare's Advanced Certificate Manager.
Private domains
Private domains enable service-to-service communication within Railway's private network. Every service automatically gets an internal DNS name under the railway.internal domain.
How private DNS works
By default, all projects have private networking enabled and services will get a DNS name in the format:
For example, if you have a service called api, its internal hostname would be api.railway.internal.
For new environments (created after October 16, 2025), this DNS name resolves to both internal IPv4 and IPv6 addresses. Legacy environments resolve to IPv6 only.
Using private domains
To communicate with a service over the private network, use the internal hostname and the port on which the service is listening:
Note: Use http (not https) for internal communication - traffic stays within the private network.
Using reference variables
You can use reference variables to dynamically reference another service's private domain:
Then in your code:
Changing the service name
Within the service settings, you can change the service name which updates the DNS name, e.g., api-1.railway.internal → api-2.railway.internal.
The root of the domain, railway.internal, is static and cannot be changed.
Private domain scope
The private network exists in the context of a project and environment:
- Services in one project/environment cannot communicate with services in another project/environment over the private network.
- Client-side requests from browsers cannot reach the private network - they must go through a public domain.
For complete information on configuring services for private networking, see the Private Networking guide.
Troubleshooting
Having trouble with your domain configuration? Check out the Troubleshooting guide or reach out on the Railway Discord.